
Propagation
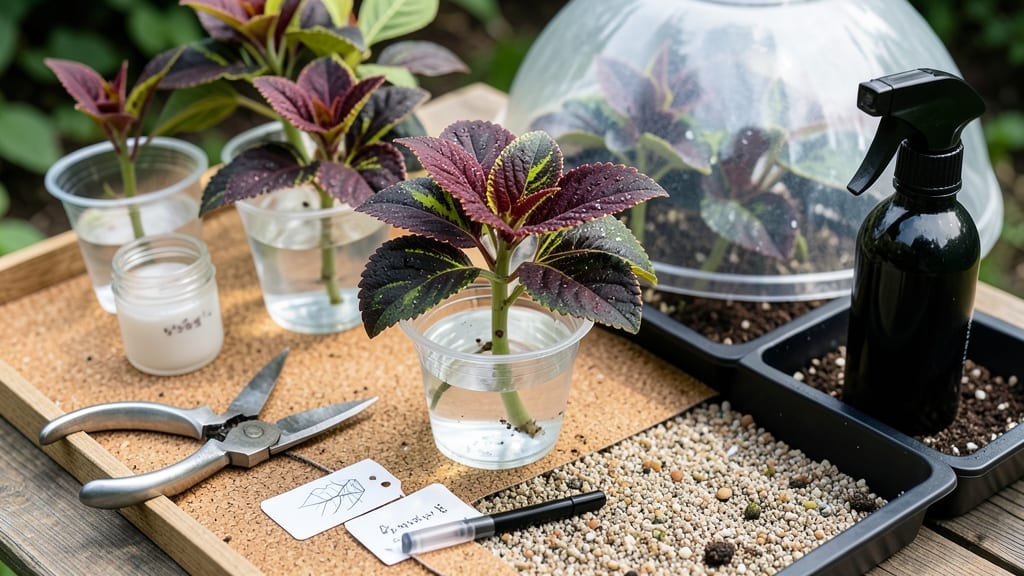
Growing cuttings from a bush turns scraps into new plants—no fancy equipment needed. 🌿 I’ve rooted everything from lavender to hydrangeas using just a pair of scissors and a jar of water, and the results are shockingly reliable when you follow a few key steps.
The trick starts with selecting 4-6 inch stems that are still green but not woody, then snipping just below a leaf node. Whether you root in water or soil, the goal is the same: create a humid, warm environment where roots can form without drying out.
Most cuttings will show roots in 2-4 weeks, though some tough bushes like rosemary take longer. By the time you’re pinching off flowers and transplanting, you’ll have identical clones of your favorite plants—free and ready to fill gaps in your garden. The best part?
You can do this in spring or early summer, when days are long and growth is fast. Works for almost any woody bush, from herbs to ornamentals. Here’s exactly how to do it right the first time.
📚 In This Guide
- What you need
- Instructions
- Tips and common mistakes
- Wrapping up and next steps
What you need
- ● Healthy cuttings: 4–6-inch (10–15 cm) stems with at least 2–3 leaves (cut just below a node).
- ● Sharp pruning shears or scissors: Sterilized to prevent disease (rubbing alcohol wipe works!).
- ○ Rooting hormone (optional but helpful): Powder or gel (e.g., Rootone or Clonex).
- ● Water (for water propagation): Room-temperature, filtered or rainwater (avoid tap water with chlorine).
- ● Clear glass or jar (for water method): Large enough to submerge 1–2 inches (2.5–5 cm) of the cutting.
- ● Well-draining potting mix (for soil method): 50% perlite/sand + 50% peat moss or coconut coir (sterilized).
- ● Small pots or trays: 4–6 inch (10–15 cm) diameter with drainage holes.
- ● Plastic bag or humidity dome: To retain moisture (cut the top off a plastic bottle if needed!).
- ● Misting bottle: For gentle hydration (avoid soaking the leaves!).
- ● Twine or rubber bands: To secure humidity domes or labels.
- ● Grow lights or sunny windowsill: Bright, indirect light (6+ hours/day).
- ● Fertilizer (low-dose): Diluted seaweed extract or rooting fertilizer after 4–6 weeks.
- ● Label markers: To track cutting types/dates (avoid losing your progress!).
- ● Hydrogen peroxide (3%): Dab on cuts to prevent bacterial growth.
- ● Heat mat (for soil method): Keeps roots warm (70–75°F/21–24°C ideal).
Step-by-Step instructions for propagating bush cuttings
Here’s my foolproof method for turning a single bush into multiple thriving plants—whether you root in water or soil.
🌱 Step 1: Select Healthy Stems and Prepare Your Tools
Choose 4-6 inch stems from the bush—look for new growth that’s semi-hardwood (not too soft, not completely woody). These should have 2-3 leaf nodes (the small bumps where leaves attach) and no flowers or buds. I always grab stems from the outer edges of the bush, as they’re more flexible and less mature.
Wash your sharp pruning shears with rubbing alcohol to sterilize them. A clean cut prevents disease from spreading to your new cuttings. Snip just below a leaf node at a 45-degree angle—this increases surface area for root growth. If you’re using a pencil or chopstick, sharpen the bottom slightly to help with water uptake.
💧 Step 2: Root in Water (The Beginner-Friendly Method)
Fill a clean glass or jar with room-temperature water, leaving 1-2 inches of stem submerged. I use filtered water to avoid chlorine, which can slow rooting. Change the water every 3-4 days to prevent bacteria buildup. Place the container in bright, indirect light—a east-facing windowsill works perfectly.
You’ll see tiny white roots within 2-3 weeks. When they reach 1-2 inches long, your cuttings are ready to transplant. Don’t rush this step—roots need time to strengthen. If the water gets cloudy before roots appear, dump it and refresh. This method works best for bushy plants like coleus, pothos, or mint.
🌿 Step 3: Root Directly in Soil (Faster and More Reliable)
Mix equal parts perlite and potting soil in a small pot to create a light, airy medium. Moisten it until damp but not soggy—you want it to hold moisture without drowning roots. Dip the cut end of your stem in rooting hormone (optional but helpful for tricky plants). Stick the cutting 1-2 inches deep into the mix, pressing gently to secure it.
Cover the pot with a plastic bag or clear lid to trap humidity, and place it in bright, indirect light. Keep the soil consistently moist—not wet, not dry. After 4-6 weeks, gently tug on the stem. If you feel light resistance, roots have formed. This method works best for succulents, lavender, or rosemary, which root poorly in water.
☀️ Step 4: Transition Rooted Cuttings to Soil
Once roots are 1-2 inches long (water method) or you feel resistance when tugging (soil method), it’s time to plant. For water-rooted cuttings, rinse off any gunk from the submerged stem before transplanting. For soil-rooted cuttings, remove the plastic cover to harden off for 3-5 days—let them adjust to normal air.
Plant in well-draining potting mix and water lightly. Keep new plants in partial shade for the first week to reduce stress. After 2 weeks, they’ll be ready to move to their permanent spot. If leaves yellow or wilt, you’ve overwatered—let the soil dry slightly between waterings.
Tips & tricks for perfect bush cuttings
Here's what nobody tells you about turning cuttings into thriving plants without the guesswork.
The Stem Selection Secret: In Step 1, when choosing your 4-6 inch stems, focus on the second set of leaves from the tip—they're the most vigorous. I've found that stems with 3 leaf nodes (not just 2) often produce stronger roots, especially for woody plants like rosemary. Avoid stems with flowers or buds—they'll drain energy from root development.
Water Rooting Troubleshooting: If your water-rooted cuttings aren't showing roots after 3 weeks (Step 2), try adding a pinch of cinnamon to the water—it naturally inhibits bacteria growth. I also recommend using a clear container so you can track root development without disturbing the cuttings. Remember, the water should only cover 1-2 inches of the stem, never more.
Soil Mix Upgrade: For Step 3's soil method, I've had the best success with a ratio of 3 parts perlite to 1 part potting soil—this gives even better drainage than equal parts. If you don't have perlite, coarse sand works in a pinch. The key is maintaining that airy texture that prevents rot while keeping moisture.
Transplanting Transition: When you're ready to move your rooted cuttings to soil (Step 4), I recommend doing it on an overcast day or in the evening. This gives your plants time to adjust without the stress of full afternoon sun. Water lightly after transplanting, but don't soak the soil—you want the roots to establish before getting too much moisture.
Pro Tips for Grow Cuttings From A Bush
- Here's what nobody tells you about turning cuttings into thriving plants without the guesswork.
- The Stem Selection Secret: In Step 1, when choosing your 4-6 inch stems, focus on the second set of leaves from the t...
- Water Rooting Troubleshooting: If your water-rooted cuttings aren't showing roots after 3 weeks (Step 2), try adding ...
Frequently asked questions
Got questions about growing cuttings from a bush? You’re not alone! Here are answers to the most common concerns to help you root your new plants with confidence.
How long does it take for cuttings to root in water vs. soil?
In water, most cuttings root in 2–4 weeks, depending on the plant type (e.g., coleus or mint root faster than roses). Soil-rooted cuttings may take 3–6 weeks but often establish stronger roots faster. Check for resistance when gently tugging—if it holds, you’re golden!
Can I root cuttings year-round, or is there a best time?
Spring and early summer are ideal for most plants since warm temps and long daylight boost rooting. Herbs and succulents can root anytime, but avoid winter for tender plants (like bougainvillea) unless you’re in a frost-free zone. Pro tip: Morning light is best for humidity-loving cuttings!
What if my cuttings rot in water before rooting?
Rot is usually caused by bacterial growth from dirty water or overcrowded jars. Fix it by:
- Changing water every 3–5 days (add a splash of hydrogen peroxide for sterilization).
- Using filtered or distilled water to avoid chlorine.
- Trimming leaves to reduce moisture loss.
Can I skip water and root directly in soil?
Soil rooting (especially in a perlite/potting mix blend) often yields healthier plants faster. Just:
- Dip cuttings in rooting hormone (optional but helpful).
- Keep soil moist but not soggy.
- Use a clear plastic bag as a humidity dome.
Why did my cutting die even though it had roots?
New roots ≠ instant success! Common killers:
- Transplant shock: Acclimate rooted cuttings to light gradually (start with shade).
- Overwatering: Yellow leaves? Let soil dry slightly between waterings.
- Pests: Check for aphids or fungus gnats—neem oil helps!
Wrapping up and next steps
Growing cuttings from a bush is a rewarding way to expand your garden without breaking the bank! 🌱 By following the right steps—whether rooting in water or soil—you’ll soon enjoy lush, thriving plants. The key is patience, consistency, and a little green thumb love.
Now that you’re armed with the know-how, why not try it today? Start with a healthy cutting, experiment with different methods, and watch your garden grow. Happy propagating! 🌿✨