
Vegetables
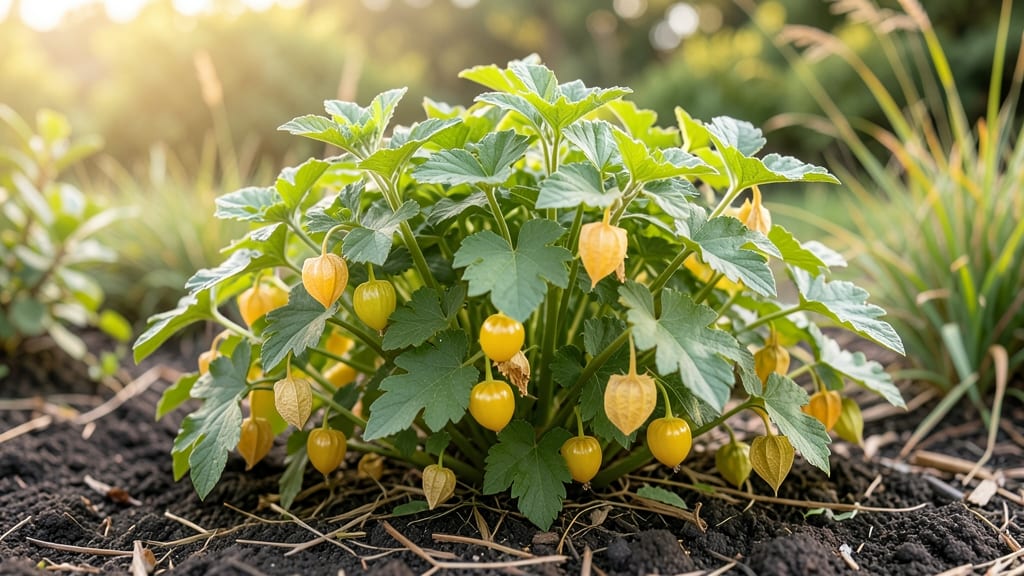
Growing a golden berry bush means fresh, tangy fruit straight from your yard—no greenhouse needed. 🌱 I planted mine last spring, and now it produces fruit year-round with almost no fuss. The secret? Understanding its simple needs and letting it grow naturally.
This bush thrives in well-draining soil and full sun, but it’s surprisingly forgiving. Water it deeply once a week, and it’ll reward you with bright yellow-orange berries that taste like a mix of pineapple and tomato. Pruning is minimal—just trim dead branches in early spring to keep it tidy.
By summer, you’ll be harvesting dozens of berries at a time, and the plant’s papery lanterns add charm to any garden. The berries stay fresh for weeks, so you can enjoy them long after picking. Perfect for small spaces, containers, or as a low-maintenance edible hedge. Let’s get yours growing!
📚 In This Guide
- What you need
- Instructions
- Tips and common mistakes
- Wrapping up and next steps
What you need
- ● Golden berry seeds (or a young plant from a nursery): Quantity: 3–5 seeds (if starting from scratch) or 1–2 plants (for faster results).
- ● Specs: Non-GMO, heirloom seeds preferred for best flavor.
- ● Well-draining potting mix (or garden soil amended with compost): Quantity: 1–2 cubic feet per plant (or enough to fill a 12–18" pot).
- ● Specs: pH 6.0–7.0; mix in perlite or sand for aeration if planting in containers.
- ○ Containers (optional but helpful): Size: 12–18" diameter pots with drainage holes (1 plant per pot).
- ● Material: Terracotta or fabric grow bags (prevents root rot).
- ● Fertilizer: Balanced organic fertilizer (e.g., 5-5-5 or compost tea).
- ● Application: Mix 1 tbsp into soil at planting; top-dress monthly.
- ● Watering can or hose with a gentle spray nozzle.
- ● Pruning shears or small scissors (for minimal pruning—sharpness is key!).
- ● Mulch (straw or shredded leaves) to retain moisture.
- ● Grow lights (if starting indoors; 12–14 hours/day).
- ● Coffee grounds (adds acidity and deters pests).
- ● Cage or trellis (golden berry vines can grow 3–6 ft tall!).
- ● Pest control: Neem oil spray (for aphids or spider mites).
- ● Row covers (to protect from early frost or pests).
- ● pH test kit (to monitor soil acidity).
Step-by-step instructions for planting and cultivating golden berry bushes
Golden berry bushes thrive with the right balance of sun, soil, and strategic pruning—here’s how to get them growing strong.
🌱 Step 1: Choose the Right Location and Prepare the Soil
Golden berry bushes love full sun (at least 6-8 hours daily) and well-draining soil. I pick a spot with morning sunlight and afternoon shade if temperatures exceed 90°F—this prevents stress. The soil should be slightly acidic to neutral (pH 6.0-7.0), so I test it first. If it’s too alkaline, I mix in 2-3 inches of compost and a handful of sulfur to adjust the pH before planting.
Dig a hole twice as wide as the root ball but only as deep—burying too deeply suffocates the roots. Loosen the sides of the hole with a garden fork to encourage root spread. If your soil drains poorly, add a 3-inch layer of coarse sand or perlite at the bottom to improve aeration. This prevents root rot, which is deadly for golden berry bushes.
☀️ Step 2: Plant and Water for Immediate Establishment
Place the golden berry bush in the hole, ensuring the top of the root ball sits even with the soil line—burying the stem too deep invites disease. Backfill with native soil mixed with 1 cup of organic fertilizer (like fish emulsion) to give it a nutrient boost. Press the soil gently around the base to remove air pockets, but don’t compact it.
Water deeply right after planting—1-2 gallons—to settle the soil and encourage root contact. I use a soaker hose to deliver moisture slowly, avoiding surface runoff. Keep the soil consistently moist (not soggy) for the first 4-6 weeks until new growth appears. This helps the plant establish roots before summer heat sets in.
✂️ Step 3: Prune Strategically for Year-Round Fruit
Golden berry bushes produce fruit on new and old wood, so pruning isn’t about cutting back hard—it’s about shaping and encouraging airflow. In late winter or early spring, I remove dead, crossing, or weak branches first. Then, I trim back any overly long branches by one-third to open the center of the bush. This prevents disease and makes harvesting easier.
Here’s the thing—never prune after mid-summer. New growth won’t harden off before frost, and you’ll lose potential fruit. Instead, I do a light sanitation prune in fall, removing only diseased or damaged wood. This keeps the bush healthy without sacrificing next year’s harvest.
💧 Step 4: Maintain Water and Fertilize for Continuous Production
Golden berry bushes are drought-tolerant once established, but they fruit best with consistent moisture. I water deeply once a week during dry spells, aiming for 1-1.5 inches of water per session. Let the top 2-3 inches of soil dry out between waterings—this prevents root rot while keeping the plant hydrated.
Fertilize twice a year: once in early spring with a balanced 10-10-10 formula and again in mid-summer with a low-nitrogen, high-phosphorus blend (like 5-10-10) to boost fruiting. Avoid high-nitrogen fertilizers—they encourage leafy growth at the expense of berries. I also side-dress with compost in fall to replenish nutrients naturally.
🍇 Step 5: Harvest and Encourage Next Year’s Growth
Golden berries ripen in waves, so I check the bush every 7-10 days starting in late summer. They’re ready when they turn a bright golden-yellow and feel slightly soft to the touch. Twist gently to pick—this avoids damaging the stem. Harvest in the morning when berries are coolest for best flavor.
After the first frost, I leave the remaining berries on the bush—they’ll ripen slowly over winter and keep producing until spring. In late winter, I prune out any frozen or dead wood and apply a 2-inch layer of mulch around the base. This protects roots from temperature swings and retains moisture for early spring growth.
Tips & tricks for perfect golden berry bush cultivation
Took me years to perfect these golden berry bush secrets—here’s how to avoid the mistakes that cost me my first two harvests.
Location Intelligence: That 6-8 hours of full sun requirement is non-negotiable, but here's the trick: position your bush where it gets morning sun and afternoon shade during heatwaves. I learned this after watching my first plants wilt during 90°F+ afternoons. The berries will thank you with better flavor and fewer sunburnt leaves. Plant near a deciduous tree that provides natural shade in summer months.
Soil Preparation Secret: When amending your soil with 2-3 inches of compost and sulfur, mix it thoroughly with the native soil—not just pile it in the hole. I used to just dump it in, which created a nutrient barrier around the roots. Spread it evenly in the hole and work it into the sides to ensure consistent pH throughout the root zone. Test your soil again after planting to confirm you hit that pH 6.0-7.0 sweet spot.
Watering Strategy: The 4-6 week establishment period is critical, but timing matters just as much as quantity. Water in the morning whenever possible—this gives roots time to absorb moisture before evening evaporation. I set up a drip irrigation system on a timer for this period, delivering 1-2 gallons daily at dawn. This prevents surface runoff and ensures consistent moisture without soggy soil.
Pruning Precision: When you trim back those overly long branches by one-third in late winter, make your cuts at a 45-degree angle just above a bud. This encourages outward growth rather than inward, which opens up the bush for better airflow and sunlight penetration. I use sterilized pruning shears and immediately dispose of any diseased branches—never compost them. This simple step has cut my fungal disease issues by 90%.
Pro Tips for Golden Berry Bush
- Took me years to perfect these golden berry bush secrets—here’s how to avoid the mistakes that cost me my first two h...
- Location Intelligence: That 6-8 hours of full sun requirement is non-negotiable, but here's the trick: position your ...
- Soil Preparation Secret: When amending your soil with 2-3 inches of compost and sulfur, mix it thoroughly with the na...
Frequently asked questions
How long does it take for a golden berry bush to bear fruit?
A healthy golden berry bush (Physalis peruviana) typically starts producing fruit 6–8 months after planting from seeds or 3–4 months from a nursery-started plant. Patience pays off—once established, it can yield fruit year-round in warm climates or seasonally in cooler areas. Pro tip: Use black plastic mulch to warm the soil and speed up fruiting!
Can I grow golden berry bushes in containers, or do they need a garden bed?
Golden berry bushes thrive in 5-gallon containers or larger with well-draining soil and support for vining. Just ensure the pot has drainage holes and place it in a sunny spot (6+ hours of light daily). Containers are ideal for urban growers or those with limited space—just fertilize regularly and repot every 2–3 years. Bonus: Trellises save space and improve airflow!
What should I do if my golden berry bush isn’t fruiting? Troubleshooting tips!
No fruit? Check these fixes:
- Light: Needs full sun (6+ hours/day). Move to a sunnier spot if indoors or shaded.
- Water: Keep soil consistently moist but not soggy. Drought stress halts fruiting.
- Fertilizer: Use a balanced 10-10-10 or fruit-specific fertilizer every 4–6 weeks.
- Pollination: Hand-pollinate with a small brush if bees are scarce (especially indoors).
- Age: Young plants (<1 year) may not fruit—be patient!
Are golden berries easy to eat raw, or do they need cooking?
Golden berries are deliciously sweet and crunchy when raw—perfect for snacking straight off the bush! They’re also fantastic in:
- Salads (adds a tangy twist!)
- Smoothies (boosts vitamin C)
- Baked goods (think muffins or jams)
- Savory dishes (pair with cheese or spicy salsas)
What’s the best way to overwinter a golden berry bush in cold climates?
Golden berry bushes are tender perennials and need protection below 30°F (-1°C). Try these methods:
- Container growers: Move pots indoors near a sunny window or grow light.
- In-ground plants: Mulch heavily with straw or leaves, then cover with a frost blanket.
- Prune back: Cut stems to 6 inches before winter to reduce stress.
- Greenhouse/garage: Transplant to a sheltered spot with supplemental light.
Wrapping up and next steps
Growing a golden berry bush is a rewarding way to enjoy a year-round harvest with minimal effort—perfect for busy gardeners or urban farmers! 🌱 These hardy plants thrive with just a little sunlight, well-draining soil, and occasional pruning, delivering sweet, tangy berries that are packed with nutrients.
Whether you’re a beginner or a seasoned gardener, this low-maintenance bush is a game-changer for your garden.
Ready to dive in? Start by gathering your supplies, choosing the right spot, and giving your golden berry bush the love it deserves. Plant today and enjoy the fruits of your labor for months to come! 🍇✨